

Description
What our Weathering and Erosion lesson plan includes
Lesson Objectives and Overview: Weathering and Erosion teaches students about two of the main ways that the surface of the Earth changes over time. Students will learn how these two processes work and about the concept of deposition. They will explore and record how soils form as a result of weathering and decomposing plant and animal remains. This lesson is for students in 3rd grade and 4th grade.
Classroom Procedure
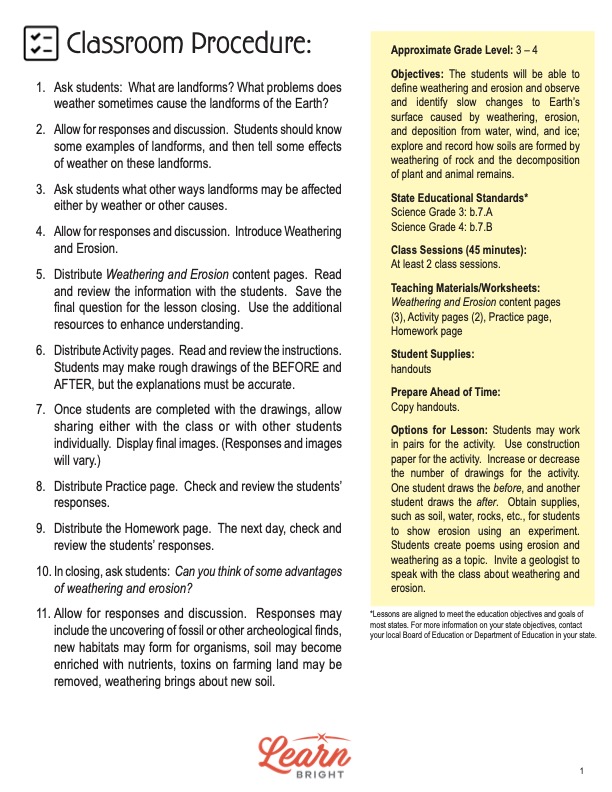
Every lesson plan provides you with a classroom procedure page that outlines a step-by-step guide to follow. You do not have to follow the guide exactly. The guide helps you organize the lesson and details when to hand out worksheets. It also lists information in the yellow box that you might find useful. You will find the lesson objectives, state standards, and number of class sessions the lesson should take to complete in this area. In addition, it describes the supplies you will need as well as what and how you need to prepare beforehand.
Options for Lesson
In the “Options for Lesson” section of the classroom procedure page, there are quite a few suggestions for additional activities or tasks or alternate ways to go about parts of the lesson. A few suggestions relate specifically to the activity worksheet. Students could work in pairs for the activity rather than alone. Instead of using the worksheet itself, they could draw on construction paper. You could increase or decrease the number of drawings. If students do work in pairs, one could draw the before images while the other draws the after images. Another option is to obtain various supplies—such as soil, water, and rocks—and have students show how erosion works using an experiment. You could also have students write poems on the topic of weathering and erosion. One more suggestion is to invite a geologist to speak to the class and answer any questions they have.
Teacher Notes
The teacher notes page has a paragraph of extra information about the lesson. It suggests using videos and images to supplement student learning and help them recognize how these processes work over long periods of time. It also recommends hands-on experiments. You can use the blank lines on this page to write down ideas you have before delivering the lesson to your class.
WEATHERING AND EROSION LESSON PLAN CONTENT PAGES
Landforms
The Weathering and Erosion lesson plan contains four pages of content. The first page provides a little information on landforms to set a foundation for the concepts of the weathering and erosion processes. There are mountains, lakes, oceans, deserts, and many other landforms that make up the Earth’s surface. A landform is a natural feature of the Earth’s surface, and it comes in many styles. These features form over a very long period, sometimes millions of years.
Landforms change over time. For example, a small stream could eventually become a raging river. A tall mountain could change into a plateau. Students will learn that islands actually form because of volcanic eruptions in the oceans, and valleys form as a result of the flow of rivers that travel from the tops and sides of mountains.
Geologists study how all these natural features of Earth develop, how they interact with each other, and how they change over time. It is possible for mankind to create landforms, such as ponds or small hills, but the majority are completely natural. They are comprised of a lot of different materials or substances, such as rocks, mud, clay, minerals, and other debris. The processes of weathering and erosion are the reason these sediments and debris move around.
Weathering
People often confuse the two processes because they both contribute to changing the natural features of the Earth. However, they are different. Weathering is the process of decomposing, breaking up, or changing the color of rocks. Erosion, however, is the process of moving rocks and sediment that broke up or decomposed because of weathering.
Geologists study weathering that involves water, air, chemicals, plants, or animals. There are three types of weathering: chemical, mechanical, and biological. All three of these can lead to the erosion of various landforms. The lesson includes a table that outlines how each type of weathering works and provides an example for each one.
The way to figure out which type of weathering occurred in a given situation is to ask how the rock broke apart. If chemicals were the source, it is chemical weathering. However, if it broke apart but is still the same rock, only smaller, it is mechanical weathering. Finally, if a living organism caused the rock to change, it is biological weathering. Students should note, however, that multiple types could contribute to the same area. In other words, a rock could change due to both chemical and biological weathering.
Erosion
Weathering causes rocks to break into smaller pieces. Usually those pieces move because of wind, water, ice, or animals. When these sediments move by natural forces, this is the process of erosion. If you shovel rocks from one place to another, this is not erosion. In other words, animals may not always be a natural force for movement, but the other three causes—wind, water, and ice—always are.
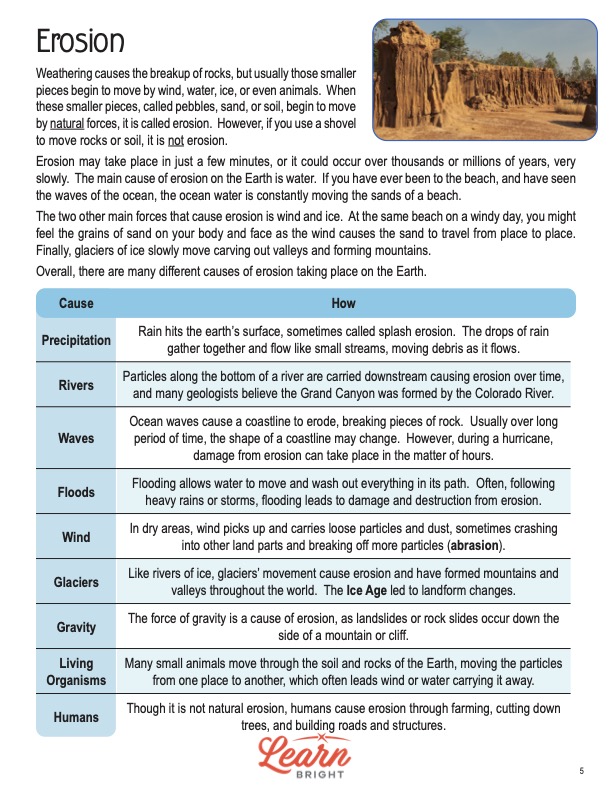
Students will learn that erosion can occur in just a few minutes or over the course of thousands or millions of years. The main cause of erosion on the Earth is water. At a beach, for instance, the waves of the ocean constantly move the sand around. Another main cause is wind, which could affect the same beach. The third main cause of erosion is ice. Glaciers of ice slowly move, carving out valleys and forming mountains.
The lesson includes another table that lists nine different causes of erosion and how each one works. These include precipitation, floods, gravity, and even humans. In this case, the lesson points out that this is not natural erosion. However, the effects of human interaction with the Earth through things like farming can cause erosion.
WEATHERING AND EROSION LESSON PLAN WORKSHEETS
The Weathering and Erosion lesson plan includes three worksheets: an activity worksheet, a practice worksheet, and a homework assignment. Each of these tasks will help students solidify what they learned throughout the lesson and demonstrate their knowledge. You can use the guidelines on the classroom procedure page to determine when to hand out each worksheet to the class.
BEFORE AND AFTER ACTIVITY WORKSHEET
The activity requires students to create four sets of before-and-after images that represent four weathering and erosion causes. Students will draw, for instance, a picture of a hill before a landslide and after a landslide. Each set of pictures has a box below it that provides room for students to explain the images they drew.
MATCH AND TELL PRACTICE WORKSHEET
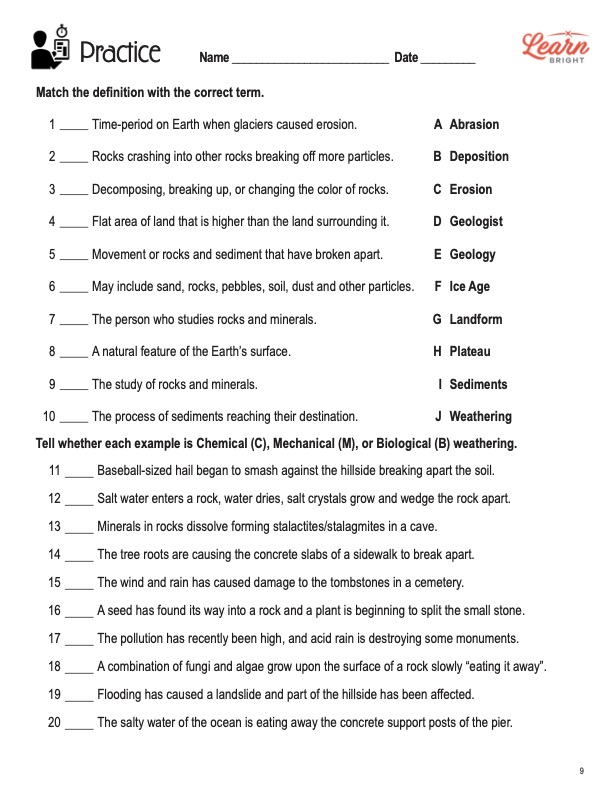
There are two sections of the practice worksheet. For the first section, students will match definitions to the correct term from the word bank. There are a total of 10 statements and terms to match. The second section requires students to tell whether each of 10 examples represents chemical (C), mechanical (M), or biological (B) weathering.
WEATHERING AND EROSION HOMEWORK ASSIGNMENT
Similar to the practice worksheet, there are two sections of the homework assignment. The first section requires students to match statements to the correct cause of erosion. For the second section, they will answer six questions according to what they learned during the lesson.
Worksheet Answer Keys
The last two pages of the lesson plan are answer keys for the practice and homework worksheets. The answers are all in red to make it easy for you to grade the assignments. The majority of students responses should match the answer keys exactly, but there may be a little variation on the homework worksheet. If you choose to administer the lesson pages to your students via PDF, you will need to save a new file that omits these pages. Otherwise, you can simply print out the applicable pages and keep these as reference for yourself when grading assignments.