


Description
What our Living and Non-living Things STEM lesson plan includes
Lesson Objectives and Overview: Living and Non-living Things STEM explores the differences between biotic and abiotic factors in the environment. Students will discover how to determine whether something is living (biotic) or non-living (abiotic) according to its properties or traits. This lesson is for students in 3rd grade and 4th grade.
Classroom Procedure
Every lesson plan provides you with a classroom procedure page that outlines a step-by-step guide to follow. You do not have to follow the guide exactly. The guide helps you organize the lesson and details when to hand out worksheets. It also lists information in the yellow box that you might find useful. You will find the lesson objectives, state standards, and number of class sessions the lesson should take to complete in this area. In addition, it describes the supplies you will need as well as what and how you need to prepare beforehand. For this lesson, you will need a tray for each group of students for the activity. Gather seeds, yeast, shells, mushrooms, soil, and rocks. You may also want to provide magnifying glasses if you can.
Options for Lesson
The “Options for Lesson” section of the classroom procedure page lists a number of suggestions for ideas and activities you could incorporate into the lesson. A couple options involve the activity worksheet. You could include more items for students to explore. It could also be a good idea to ask parents to bring in different living and non-living objects. Before reading the content pages, have students develop their own set of characteristics to determine if something is biotic. Then the students can compare them with the list in the content pages to see how many they could name. Another option is to invite a biologist into the classroom to talk about single-celled organisms and how they are also alive. One more suggestion is to let students see life in its smallest form under a microscope to provide another example of a biotic item.
Teacher Notes
The teacher notes page provides an extra paragraph of information to help guide the lesson and remind you what to focus on. The blank lines on this page are available for you to write out thoughts and ideas you have as you prepare the lesson.
LIVING AND NON-LIVING THINGS STEM LESSON PLAN CONTENT PAGES
Biotic or Living Things
The Living and Non-living Things STEM lesson plan contains three pages of content. To start off, the lesson asks students to look around them and observe things around. They might see objects like a desk, a chair, their friends, the teacher, a pencil, and so on. Everywhere we look, there are things around us. All of these things can be put into one of two groups—living or non-living.
All living things breathe, eat, grow, move, reproduce, and have senses. They have “life,” but not all life is the same. Some living things have different reactions, breathe differently, or reproduce in a unique way. But all living things are made up of microscopic structures called cells. And all living things move in some way or have the ability to move. They also all digest food for energy and excrete waste from the body. Living things produce new life of their own kind. They have a life cycle that begins with birth, then growth, then reproduction, and finally death.
The lesson provides a number of specific characteristics that apply to living or biotic things. Biotic things can grow and develop and respond to their environment or stimuli. They all require oxygen to breathe and produce energy, and they require energy to perform different metabolic activities. In addition, living things can adapt to their environment. Examples include fish, roses, grasshoppers, and blue jays.
Abiotic or Non-living Things
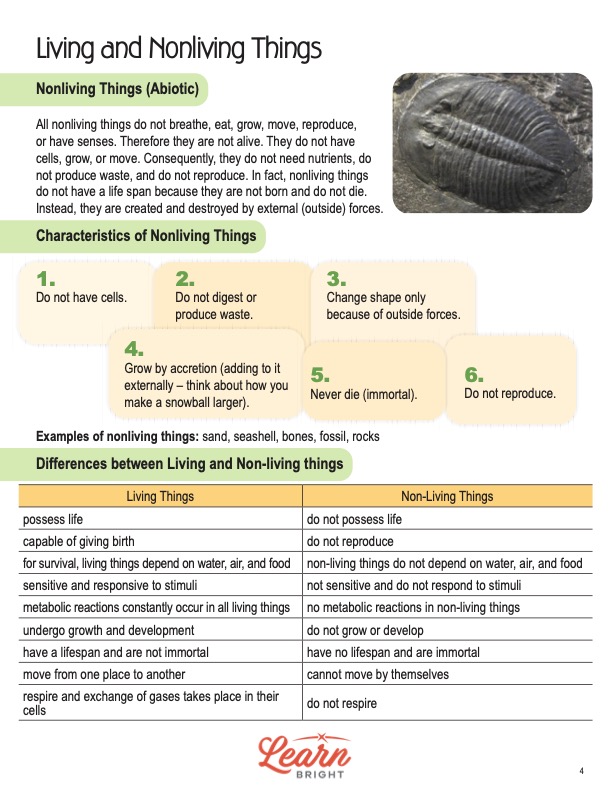
Non-living things, on the other hand, do not breathe, eat, grow, move, reproduce, or have senses. Therefore, they are not alive. They do not have cells, they do not grow, and they cannot move. Consequently, they do not need nutrients and thus don’t have to produce waste. In fact, non-living things do not have a life span because they are not born and do not die. Instead, they are created and destroyed by external (outside) forces.
Again, the lesson provides a number of traits or characteristics that apply to non-living or abiotic objects. Non-living things have no cells and do not digest or produce waste. They change shape only because of external forces and can never die. In addition, an abiotic thing can only grow by accretion, meaning that someone has to add to it externally. A good example is adding snow to make a snowball bigger and bigger.
The second content page also offers a table that students can review that shows the differences between biotic and abiotic things. It contains many of the same traits that the other sections listed earlier in the lesson plan. However, it explains these a little differently and also offers a few other differences for students to observe.
How to Tell the Difference
The environment is full of living and non-living things. Being able to tell them apart is an essential scientific concept. Biotic (living) factors are organisms, their products, and their wastes. Abiotic (non-living) components of the environment include both chemical and physical factors. For easy differentiation between biotic and abiotic things, scientists developed a basis for classification.
Anything that has life is considered living. However, some things have a few of the necessary traits to be considered biotic but are actually abiotic. For example, an icicle grows as new water freezes. However, it is still non-living because it doesn’t breathe, reproduce, or respond when it falls or breaks down. So to be classified as a living thing, it has to meet all of the criteria, not just one or two.
LIVING AND NON-LIVING THINGS STEM LESSON PLAN WORKSHEETS
The Living and Non-living Things STEM lesson plan includes three worksheets: an activity worksheet, a practice worksheet, and a homework assignment. Each one will reinforce students’ comprehension of lesson material in different ways and help them demonstrate when they learned. Use the guidelines on the classroom procedure page to determine when to distribute each worksheet to the class.
BIOTIC OR ABIOTIC ACTIVITY WORKSHEET
On the activity worksheet is a table with five empty rows and eight columns. You will provide students with a tray of items, some of which are living and some which are non-living. Students will look at each item and determine whether it is biotic (living) or abiotic (non-living). The columns of the table provide space for students to list each item and its traits. The last two columns ask students to write whether the item is living or non-living and then provide evidence to support the choice.
GROUP SHARE PRACTICE WORKSHEET
Students will work in groups for the practice portion of the lesson. First, students will answer the five questions on the worksheet page. Then they will discuss their answers with the group. Once all the groups have had the chance to discuss their thoughts, they will take turns sharing with the rest of the class what they learned.
LIVING OR NON-LIVING THINGS STEM HOMEWORK ASSIGNMENT
For the homework assignment, students will look around their homes and find various objects that are living or non-living. The table on the page provides space for 10 items in each of the two categories.
Worksheet Answer Keys
The lesson plan provides answer keys for all three of the worksheets. The correct answers are in red to make it easy for you to compare them with students’ responses. Many of the prompts are objective. As a result, students’ answers will vary. However, the answer keys provide sample answers where appropriate. If you choose to administer the lesson pages to your students via PDF, you will need to save a new file that omits these pages. Otherwise, you can simply print out the applicable pages and keep these as reference for yourself when grading assignments.