Description
What our Angles lesson plan includes
Lesson Objectives and Overview: Angles introduces students to the different types of angles and how to use a protractor to measure and draw angles. At the end of the lesson, students will be able to identify and define types of angles and define and use terms related to angles. This lesson is for students in 4th grade, 5th grade, and 6th grade.
Classroom Procedure
Every lesson plan provides you with a classroom procedure page that outlines a step-by-step guide to follow. You do not have to follow the guide exactly. The guide helps you organize the lesson and details when to hand out worksheets. It also lists information in the blue box that you might find useful. You will find the lesson objectives, state standards, and number of class sessions the lesson should take to complete in this area. In addition, it describes the supplies you will need as well as what and how you need to prepare beforehand. The supplies you will need for this lesson are protractors and the handouts. To prepare for this lesson ahead of time, you can copy the handouts and gather the protractors.
Options for Lesson
Included with this lesson is an “Options for Lesson” section that lists a number of suggestions for activities to add to the lesson or substitutions for the ones already in the lesson. One suggested addition to this lesson is to have students create a piece of art that uses each of the different types of angles. You can also hand out craft sticks and have students create examples of each type of angle by gluing them together. It might be a good idea to teach this lesson in conjunction with a lesson on polygons, and have students identify the types of angles in each polygon. You could also create a large cardboard protractor for your classroom and measure large angles, like windows. A final optional addition is to invite an architect to speak to your class about how they use angles in their work.
Teacher Notes
The teacher notes page includes a paragraph with additional guidelines and things to think about as you begin to plan your lesson. It notes that, due to the number of vocabulary terms associated with this lesson, mnemonic devices will be helpful. Students can use the ones in the lesson or make up their own. It also notes that you must provide protractors for this lesson. This page also includes lines that you can use to add your own notes as you’re preparing for this lesson.
ANGLES LESSON PLAN CONTENT PAGES
Angles
The Angles lesson plan includes four content pages. The lesson begins with descriptions of the various terms needed to understand angles. Students will learn that, unlike normal straight lines, which can go on forever, or segments with two end points, angles are formed using lines called rays. When two rays, which are lines with one endpoint, have the same endpoint, they form an angle. We call their common endpoint a vertex. Students will learn that angles are all around and that there are many terms related to them. The lesson includes a diagram of a typical angle formed by two rays that share a common endpoint.
Next, students will learn that all kinds of geometric shapes have angles. The lesson shows examples of some of these. Triangles, for example, have three angles, while other shapes like octagons have more! Squares have four, pentagons have five, and hexagons have six. Every polygon has angles. Not every angle is the same size. We measure angles using degrees (°). The degrees used to measure angles are not the same as the degrees used to measure temperature. Angles can have any degree measurement between 0° and 360°. A full circle is 360°.
Measuring Angles
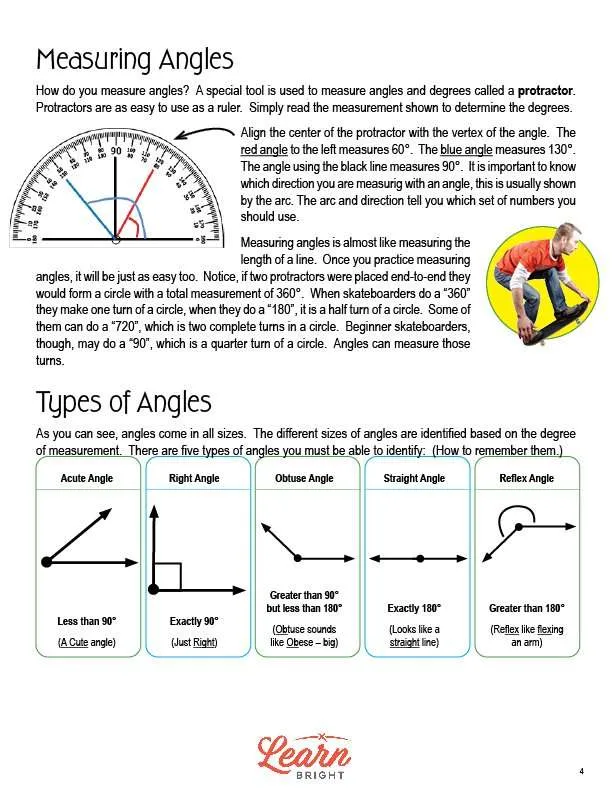
Next, students will learn how to measure angles using a special tool called a protractor. To use a protractor, you just have to read the measurement to determine the angle. You should align the center of the protractor with the vertex of the angle you want to measure. The lesson includes an example of this. The red angle in the example measures 60°, the blue angle measures 130°, and the black angle measures 90°. Protractors have two sets of numbers listed so it’s important to know which direction you are measuring in. You can use the arc to figure out the right direction.
Students will learn that measuring angles with a protractor is just as easy as measuring a straight line with a ruler!
Types of Angles
Next, students will learn about the different types of angles. We use the degree of measurement to identify these different types and sizes of angles. The lesson lists five types of angles: acute (less than 90°); right (exactly 90°); obtuse (greater than 90° but less than 180°); straight (exactly 180°); and reflex (greater than 180°). The lesson also provides some mnemonic devices to help students remember each type of angle.
Students will then learn how to label angles using a few examples. It notes that you should label all angles in a single figure using the same method to keep things consistent and easy to understand. There are two additional terms that students need to know when labeling and identifying angles. The first is complementary angles, which are two angles that equal 90° when added together. The second is supplementary angles, which are two angles that equal 180° when added together. The lesson provides examples to illustrate both of these. One of the examples shows that 30° angle and a 60° angle would be complementary, because they equal 90° when added together.
Drawing Angles
Finally, students will learn how to draw angles using a protractor. The lesson has students draw a 50° angle for practice. The lesson includes five steps students must follow to draw this angle. The first step is to find the center line on their protractor. Next, they must align the protractor on a straight line. Then, they will find 50° on the bottom row of numbers and mark it. They will then make another point above the center line. Finally, they use a ruler or their protractor to connect the two points to make a 50° angle!
It’s important for students to understand that being able to identify and draw angles is important for many different reasons. Artists, architects, engineers, and more use angles in their work. You can also find them in everyday objects around your house and in your community!
Key Terms
Here is a list of the vocabulary words students will learn in this lesson plan:
- Rays: the lines used to form angles
- Angles: formed by two rays that share a common endpoint
- Vertex: the common endpoint of an angle
- Degrees: the unit that the size of an angle is measured in
- Protractor: the tool used to measure angles and degrees
- Complementary angles: two angles that equal 90° when added together
- Supplementary angles: two angles that equal 180° when added together
ANGLES LESSON PLAN WORKSHEETS
The Angles lesson plan includes three worksheets: an activity worksheet, a practice worksheet, and a homework assignment. You can refer to the guide on the classroom procedure page to determine when to hand out each worksheet.
ANGLE DRAWING ACTIVITY WORKSHEET
For the activity worksheet, students will use a protractor to draw several angles that the worksheet describes. For example, they have to draw an acute angle three times their age. They must also write the measurement degree down. Once they’ve finished, they will swap their worksheet with another student to correct their answers.
Students can work in pairs for this activity if you’d prefer.
ANGLES PRACTICE WORKSHEET
The practice worksheet has students complete two exercises. For the first exercise, they will match types of angles with their descriptions. For the second exercise, they will use a given diagram to answer questions. Both of these exercises will test their understanding of the lesson material.
FINDING ANGLES AT HOME HOMEWORK ASSIGNMENT
Students will look around their home or neighborhood to find examples of different types of angles for the homework assignment. They will both sketch the angle and describe it using words for each type. The types of angles they must find are acute, obtuse, reflex, straight, and right.
If you’d like to add an additional element to this assignment, you can have students take pictures of each angle they find to share with the class.
Worksheet Answer Keys
This lesson plan includes answer keys for the practice worksheet. No answer key is provided for the activity worksheet or the homework assignment. If you choose to administer the lesson pages to your students via PDF, you will need to save a new file that omits these pages. Otherwise, you can simply print out the applicable pages and keep these as reference for yourself when grading assignments.


